
Desk Cable Management: A Practical Guide for Philippine Home Offices
How to Organize Desk Cables Without Losing Access to Power
Good desk cable management means you can unplug your laptop, move your monitor and clean beneath your desk without untangling everything. Hiding every wire is less important than keeping connections accessible and cables out of the chair’s path.
Start with what you already own. Many Philippine home offices need a few reusable ties and a suitable tray—not a new electrical installation. Work through the routes first; consider better outlet placement only if access remains awkward.
1. Identify the clutter before buying organizers
Look behind the monitor and beneath the desktop. Sort the problem into four groups:
- Data leads: HDMI, DisplayPort, Ethernet and USB cables connecting equipment.
- Power leads and adapters: Device cords, laptop chargers and separate power bricks.
- Excess length: Spare cable that hangs into your knees or catches a wheel.
- Outlet access: Plugs you cannot reach without moving furniture, or cords crossing a walkway to reach power.
These need different fixes. A clip keeps a charging lead within reach; it cannot support a heavy adapter. A tray provides storage and routing, not extra electrical capacity. Remove unused leads before buying anything.
If cords are damaged, plugs fit poorly or you notice scorching, stop using the affected equipment and seek qualified help. Do not disguise an electrical problem inside a cable box.
2. Map one desk’s cable routes
Put your laptop or PC, monitor, dock and phone charger where you actually use them. Identify the existing socket and check that you can reach the plug. Sketch each connection before fastening it.
For a laptop-and-dock setup, route the monitor’s data lead toward the dock along the rear of the desk. Give the laptop’s removable dock lead its own accessible path. Route each powered device toward its suitable supply, supporting any adapter separately. Keep the phone lead near your hand rather than tying it into a permanent bundle.
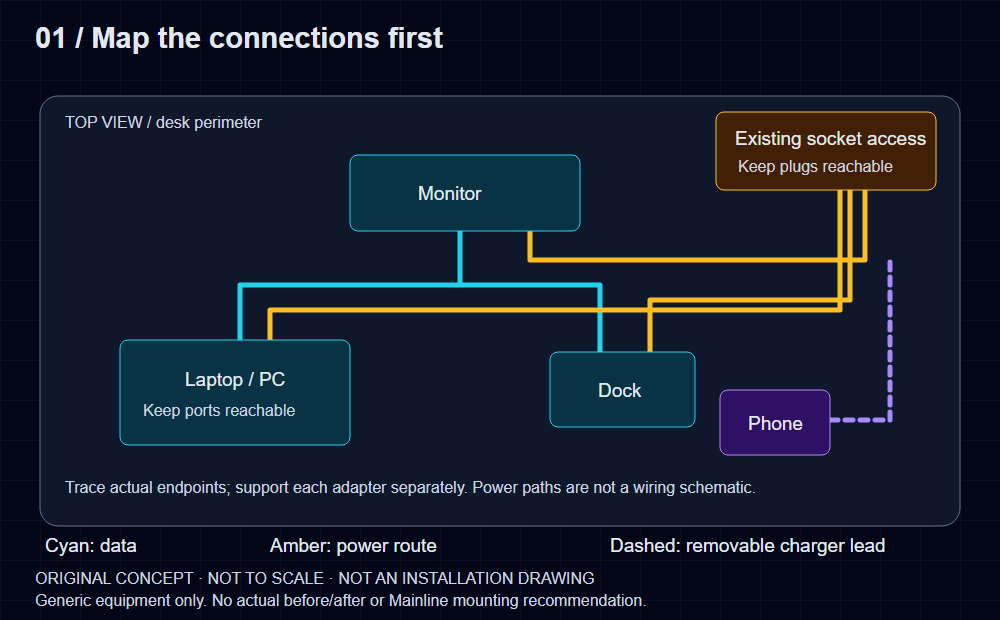
Concept 1: plan connections by destination. Original illustration; not a customer installation, product depiction, electrical schematic or tested layout. Paths are illustrative, not measured.
Check the same plan from below: will a drawer, desk frame or chair interrupt a route? Leave connections reachable. A tidy bundle that must be dismantled every morning is the wrong bundle.
3. Choose an organizer for the job
| Organizer | Useful for / unsuitable for | Mounting and desk compatibility | Access and removal |
|---|---|---|---|
| Reusable hook-and-loop ties | Grouping leads with a shared route; not hanging bricks from cables | Wrap around leads without crushing them; no desktop attachment needed | Reopen when swapping equipment |
| Cable clips | Holding a light lead near an edge; not supporting heavy adapters | Adhesive or screw versions; check finish compatibility and permitted fixing | Choose a clip that releases the cable; adhesive may leave residue or lift a finish |
| Split sleeve | Keeping several compatible leads together; not containing adapters | Encloses cables rather than attaching to the desk; follow cable and sleeve instructions | Split designs open for changes; labels should remain visible |
| Under-desk tray | Supporting suitable cables and adapters; not adding outlet capacity | Clamp or screw types; verify edge shape, thickness, material and rated support | Choose access that lets you remove one adapter without unloading everything |
| Surface cable raceway | Guiding a fixed route; not a flexible bridge for a moving desk | Adhesive or screw mounting on approved surfaces; check permitted cable use | Removable covers help access; removal can mark the surface |
For a no-drill setup, a compatible clamp tray and reusable ties are a useful starting point. Check for an underside apron, bevelled edge or hollow construction before ordering. Screw-mounted organizers need the desk manufacturer’s approval for the material and fixing method. Do not drill glass. “No-drill” does not mean “damage-free,” especially with adhesives or excessive clamp pressure.
4. Route and label, one connection at a time
- Photograph your connections. Shut down equipment and disconnect power as appropriate before rearranging it, following device and accessory instructions.
- Label both ends. “Monitor power” and “dock USB” are more helpful than a bundle of identical black cables.
- Fit approved supports first. Follow the organizer’s instructions. Check that a tray or clip will not interfere with drawers, controls or the desk mechanism.
- Route by destination. Keep removable leads separate from the cables that stay put. Avoid tight bends, trapped cables and tension at connectors.
- Support adapters properly. Use a suitable tray or holder according to its instructions; do not leave a brick hanging by its cord. Preserve the ventilation required by the equipment manufacturer, and keep disconnects accessible.
- Reconnect and check. Confirm each device works, labels remain readable and nothing enters the chair’s path. Do not tighten ties simply to make the bundle smaller.
ESFI’s cord-safety guidance warns against damaged or hot cords, overloading, chained multiple-outlet devices and using extension cords as permanent wiring. Organizing cables does not remove those risks. Ask a qualified electrician about persistent outlet shortages rather than concealing another extension.
5. Leave room for standing-desk movement
A route that works while seated can pull tight when the desk rises. Identify which equipment moves with the desktop and which connection stays at the wall.
Follow your desk and accessory manuals for routing and slack. Check the full movement range as instructed, keeping people and objects clear. Stop if a cord stretches, catches, gets trapped or pushes against a connector. Do not choose a universal slack measurement: the required movement depends on your setup.
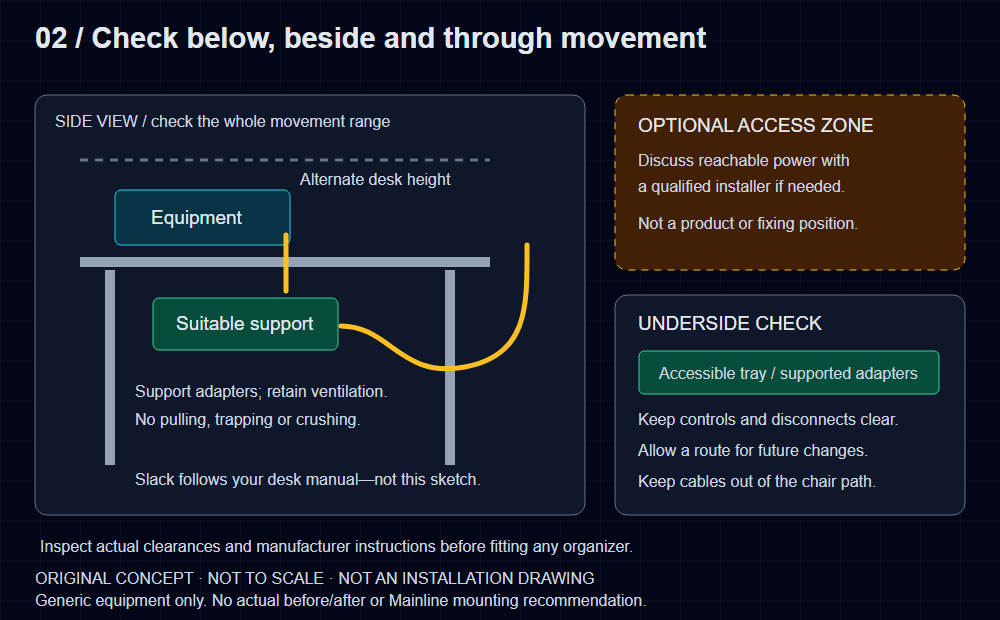
Concept 2: preserve movement, support and access. Original illustration; not to scale, not an installation drawing and not an actual before-and-after. The optional outlet-access zone does not prescribe a mounting position or Mainline compatibility.
For example, UPLIFT’s Magnetic Cable Channel instructions warn against pinch points and require enough slack for the full desk-height range. That is product-specific guidance, not permission to fit the same accessory to every desk.
6. When better outlet placement helps
Organizers are enough when your existing outlets are suitable and reachable, and the remaining problem is loose leads or unsupported adapters. Finish the routing job before shopping for a power system.
If the remaining problem is reaching power, ask a qualified installer whether different outlet placement would help. A professionally installed Mainline power track is one optional approach to positioning movable sockets near the work area. It does not remove monitor or data leads, eliminate overload risk, or make every mounting location suitable.
Two Mainline posts illustrate why outlet placement and cable organization are separate decisions:
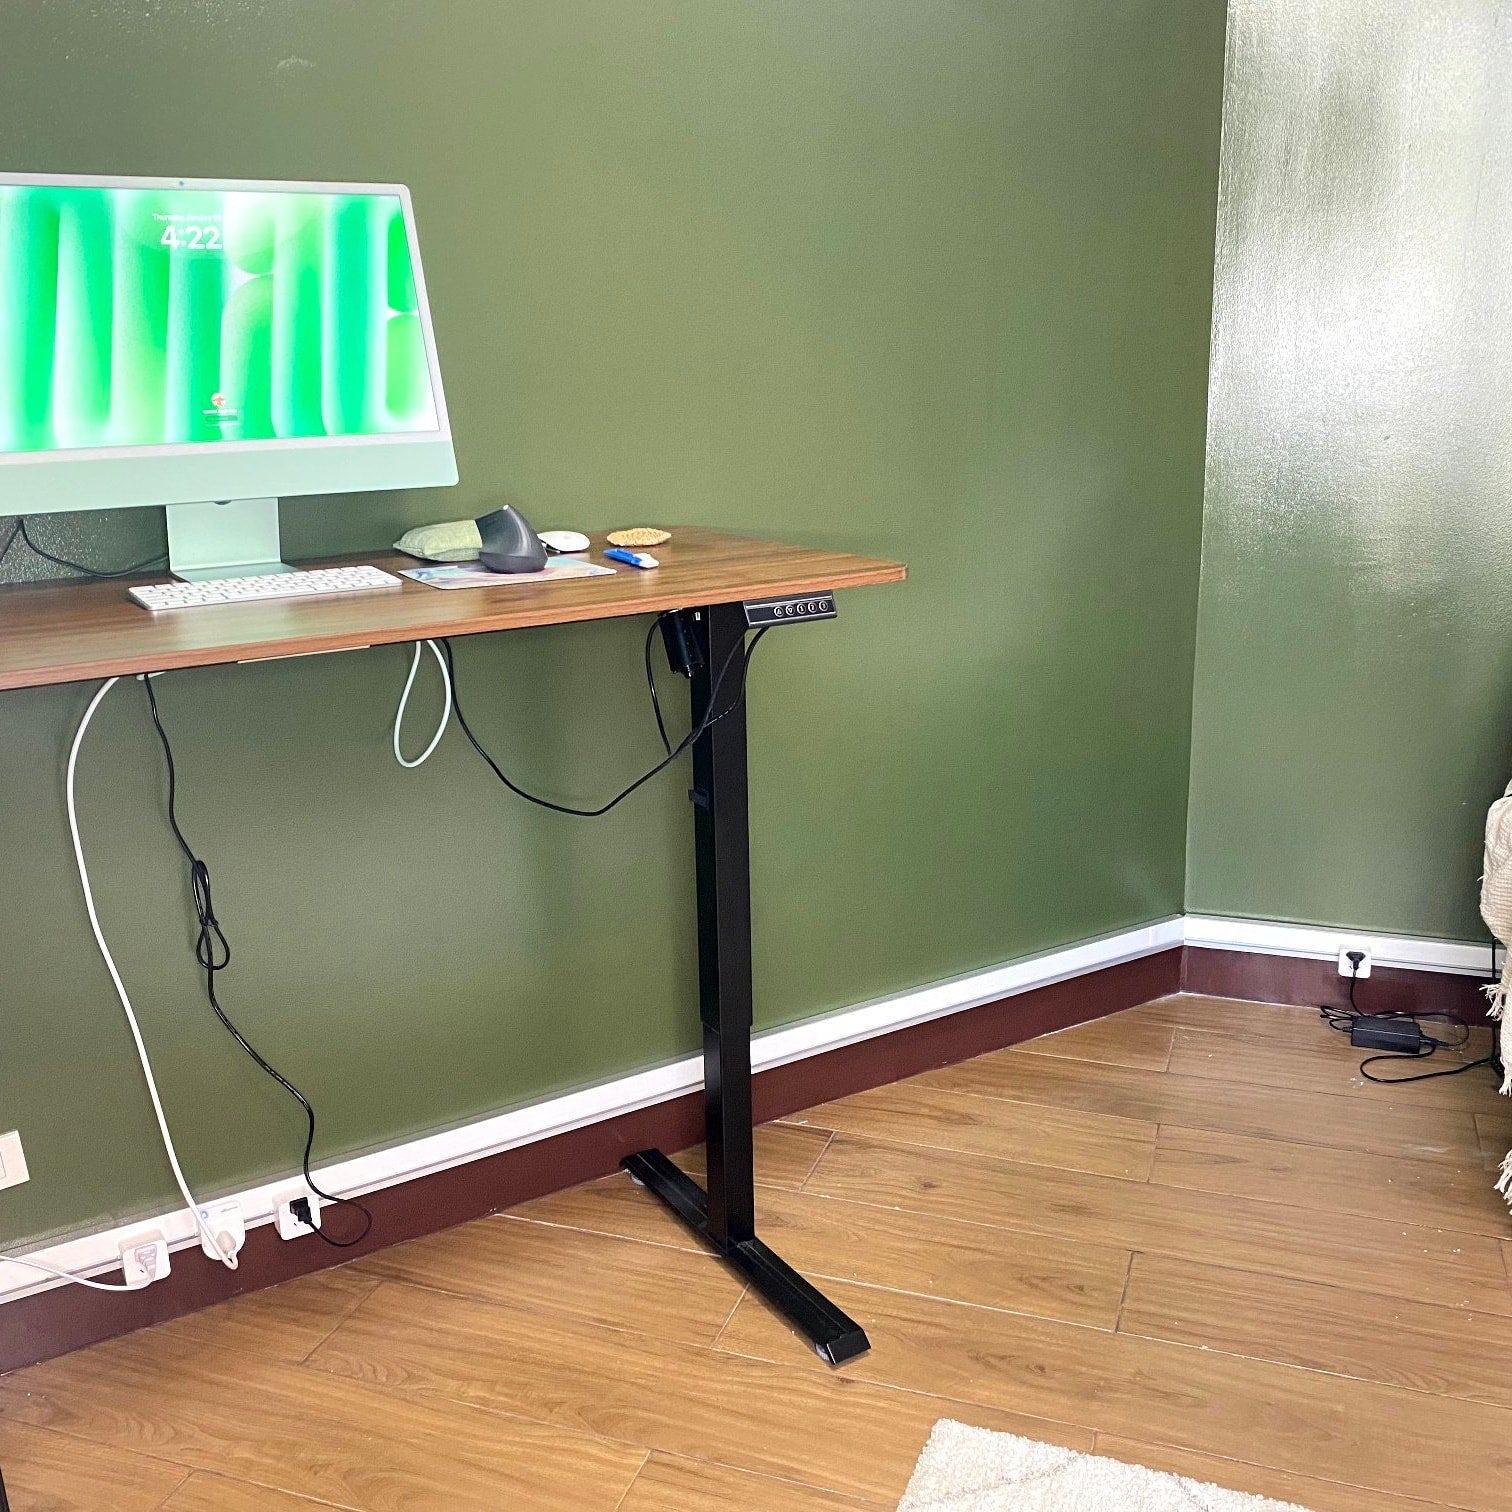
Source: Mainline Power Philippines, Makati post. Mainline’s caption identifies Makati. Visible hanging cords and a floor-level adapter mean this is not evidence of completed cable management; no before/after sequence is claimed.
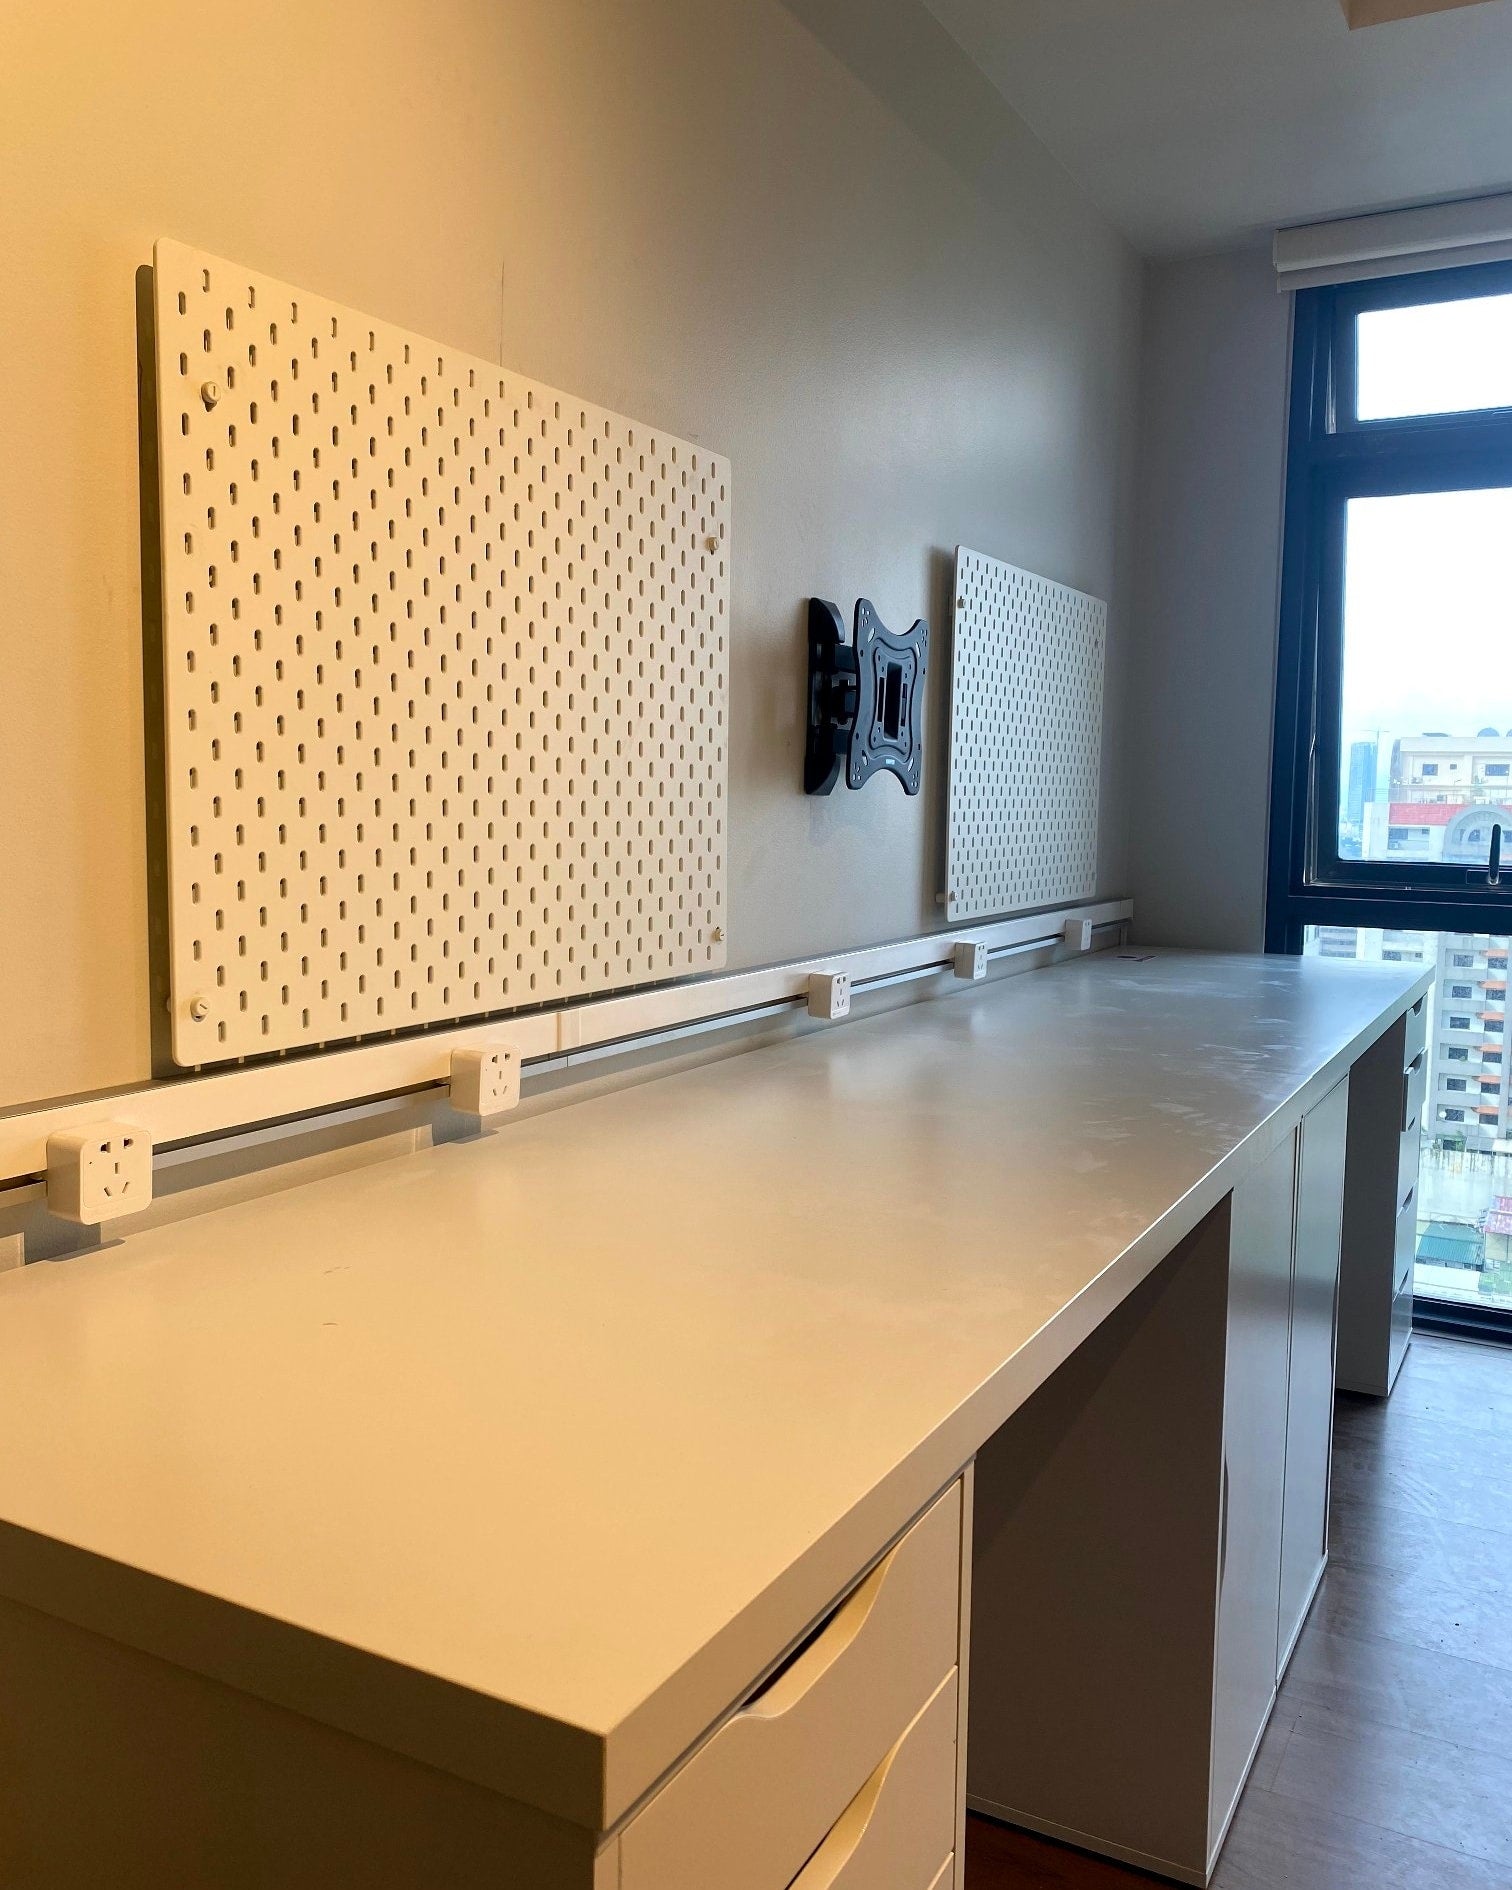
Source: Mainline Power Philippines, Portico by Ayala Land post. Project name comes from Mainline’s caption. This view illustrates outlet placement; with no connected workstation devices visible, it does not demonstrate the finished cable routes.
For broader room-level planning, see the related Philippine home-office setup guide.
7. Keep the setup easy to maintain
When cleaning or adding equipment, check for damaged insulation, loose supports and trapped leads. Keep plugs reachable and remove abandoned cables. After adding a monitor, revisit its data route, power connection and adapter support—not just the space on top. Recheck movement on an adjustable desk.
Is a tray better than a cable box?
A tray can keep suitable equipment off the floor and accessible. A box hides contents, but must suit the equipment and its ventilation requirements. Neither fixes an unsuitable electrical supply.
Can renters organize cables without drilling?
Often, yes: use compatible removable organizers first. Obtain permission before modifying a desk or wall. Check the lease and building rules before any electrical installation; adhesive products can also damage finishes.
Should every cable disappear?
No. A visible charging lead that is easy to remove can be better than a hidden one under strain. Aim for clear routes, accessible connections and straightforward changes.